From Tour Creation to First Booking
This guide is your complete journey map as a new Vaylo customer. Follow every step in order and you will have a live tour with your first booking taken by the end.
Your Journey at a Glance
| Stage | What you do |
|---|---|
| ⚙️ 1. Build Content | Add locations, categories, supplements, hotels |
| 🗺️ 2. Create Tour | Build and publish your first tour |
| 📋 3. Take Booking | Create your first customer booking |
Stage 1: Before You Create a Tour — Build Your Content
Tours are assembled from content pieces that must exist in the system first. Use this checklist and complete each item before moving to Stage 2.
| # | What to set up | Where to go | Required? | Guide |
|---|---|---|---|---|
| 1 | Locations | Settings → Locations | ✅ Yes | View guide |
| 2 | Tour Categories | Tour Administration → Tour categories | ✅ Yes | View guide |
| 3 | Tags | Settings → Tags | ✅ Yes | View guide |
| 4 | Supplement Categories | Tour Administration → Supplement categories | ✅ Yes | View guide |
| 5 | Supplements | Tour Administration → Supplement | ✅ Yes | View guide |
| 6 | Vehicles | Tour Administration → Vehicles | ⚠️ If needed | View guide |
| 7 | Hotels & Amenities | Hotel Administration | ⚠️ If needed | View guide |
| 8 | Tour Template | Tour Administration → Tour templates | 💡 Optional | View guide |
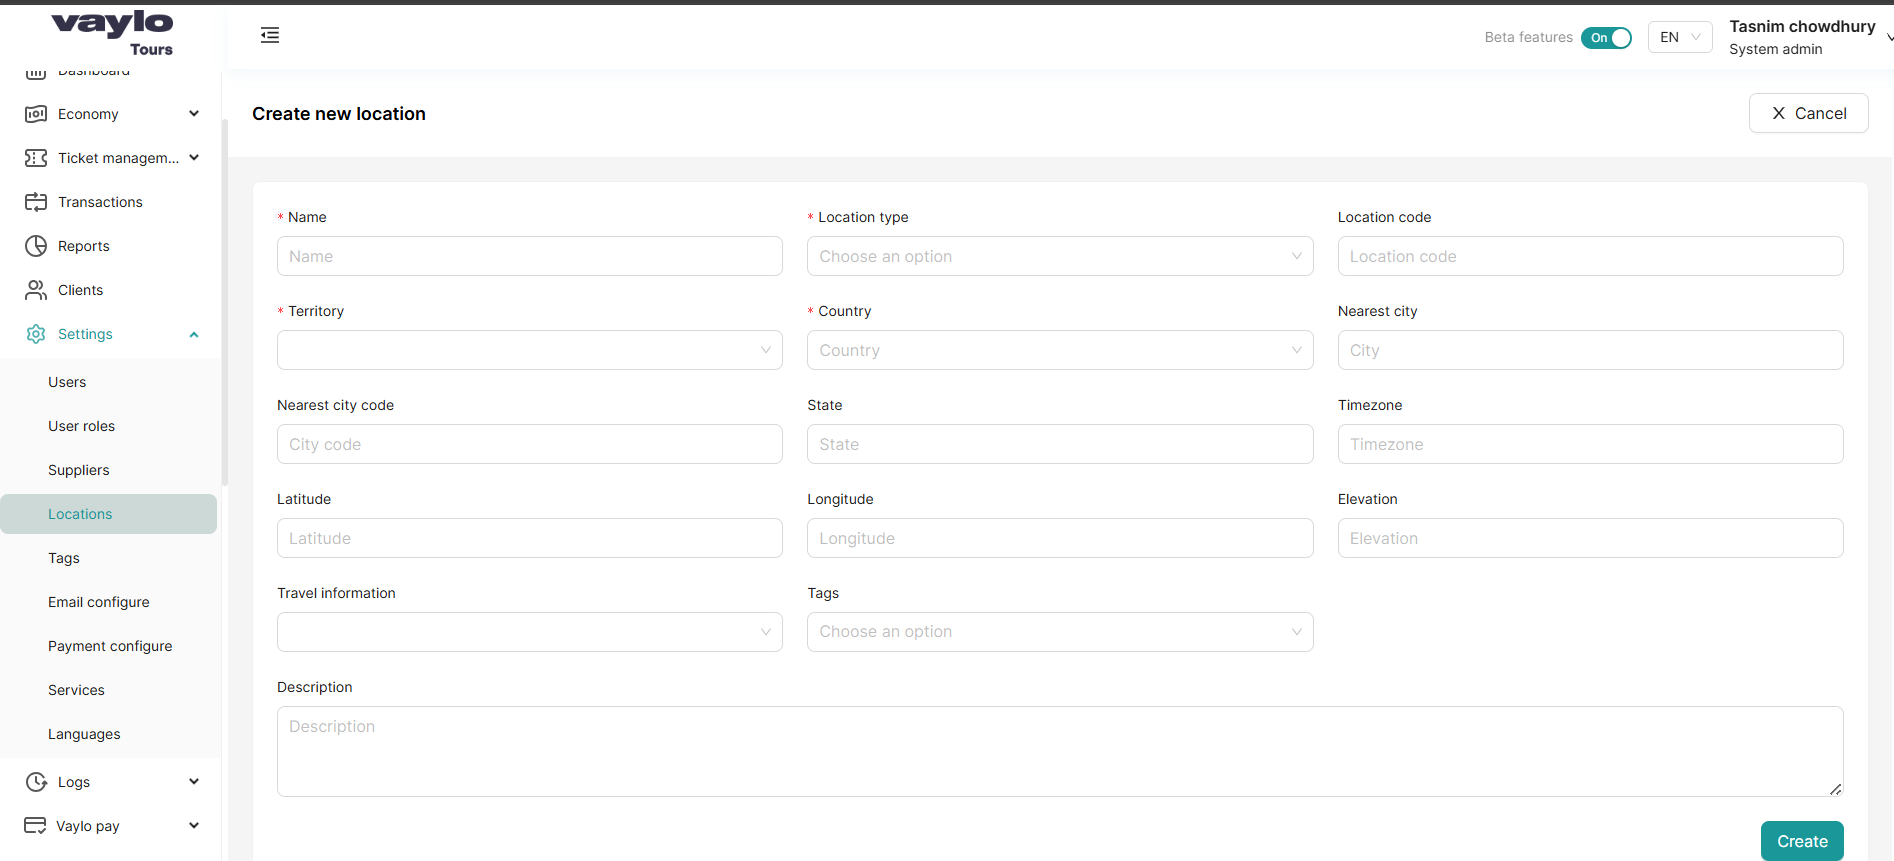
Step 1.1 — Add Locations
Go to Settings → Locations → Create Location
Locations define where tours depart from and travel to.
What to create:
- Locations — cities, regions, or custom points
- Location types — categorise your locations
- Pickup location areas — every pickup point must be linked to a location area
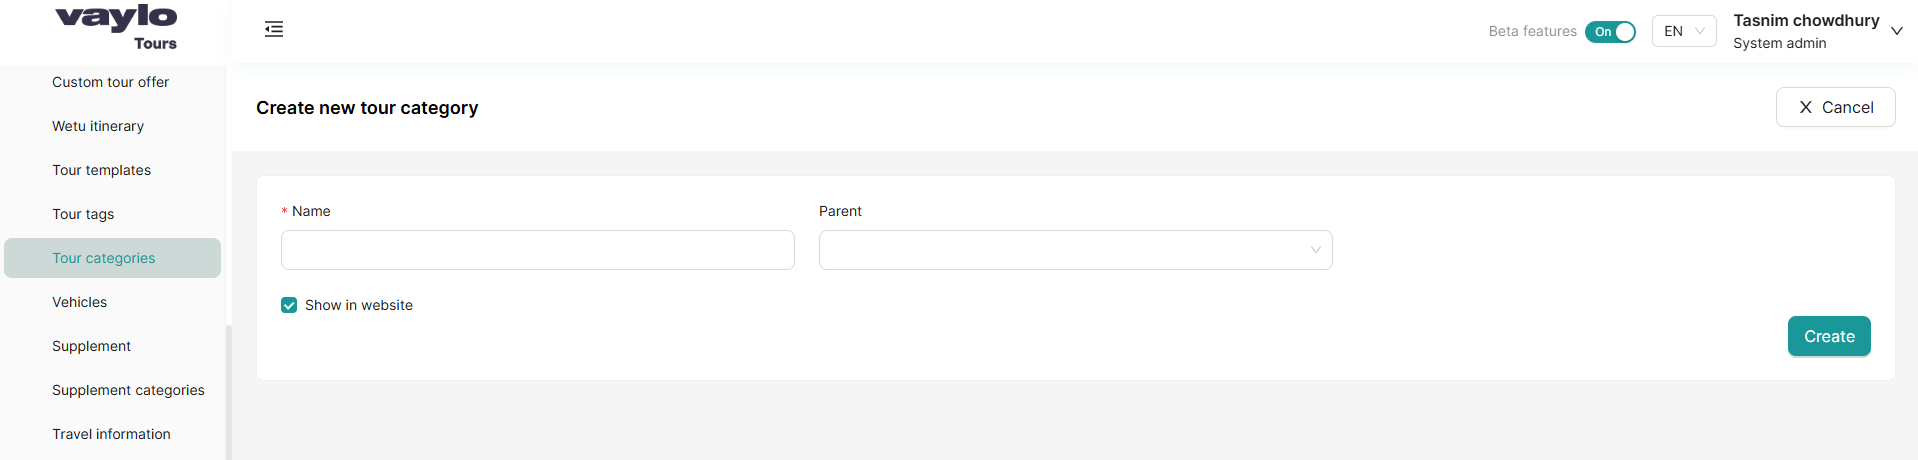
Step 1.2 — Add Tour Categories
Go to Tour Administration → Tour categories
Categories group your tours by type (e.g., Guided Tours, Self Drive, City Breaks). Customers can filter by category on the booking widget.
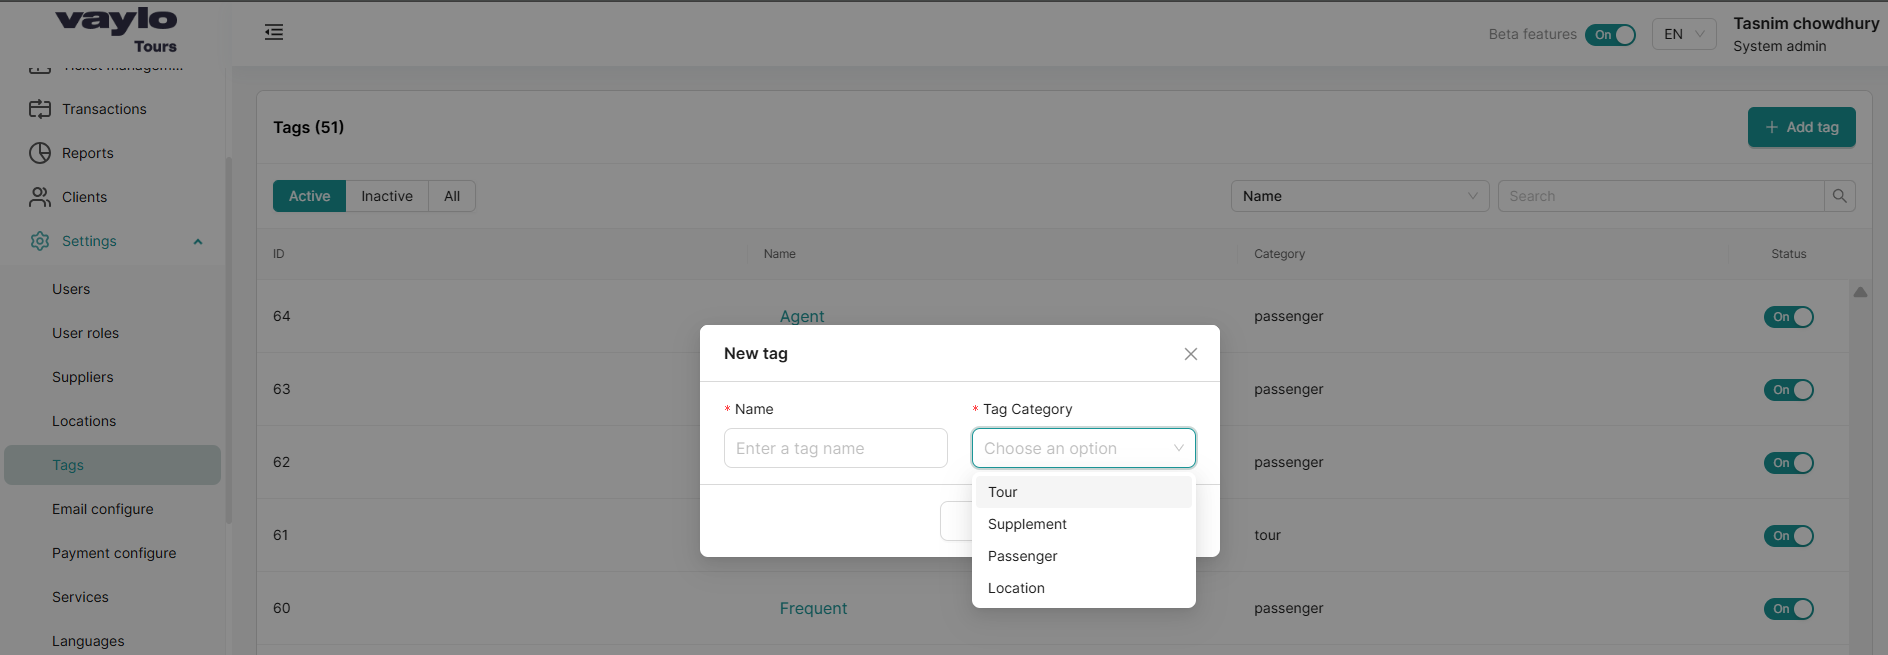
Step 1.3 — Add Tour Tags, Tags
Go to Settings → Tour Tags
Tour Tags help customers search and filter tours.

Go to Settings → Tags
When a tag is created under the Tour category it appears on the Tour Creation page. Tags created under Supplement appear when adding supplements. Tags under Passenger appear on the passenger profile page.
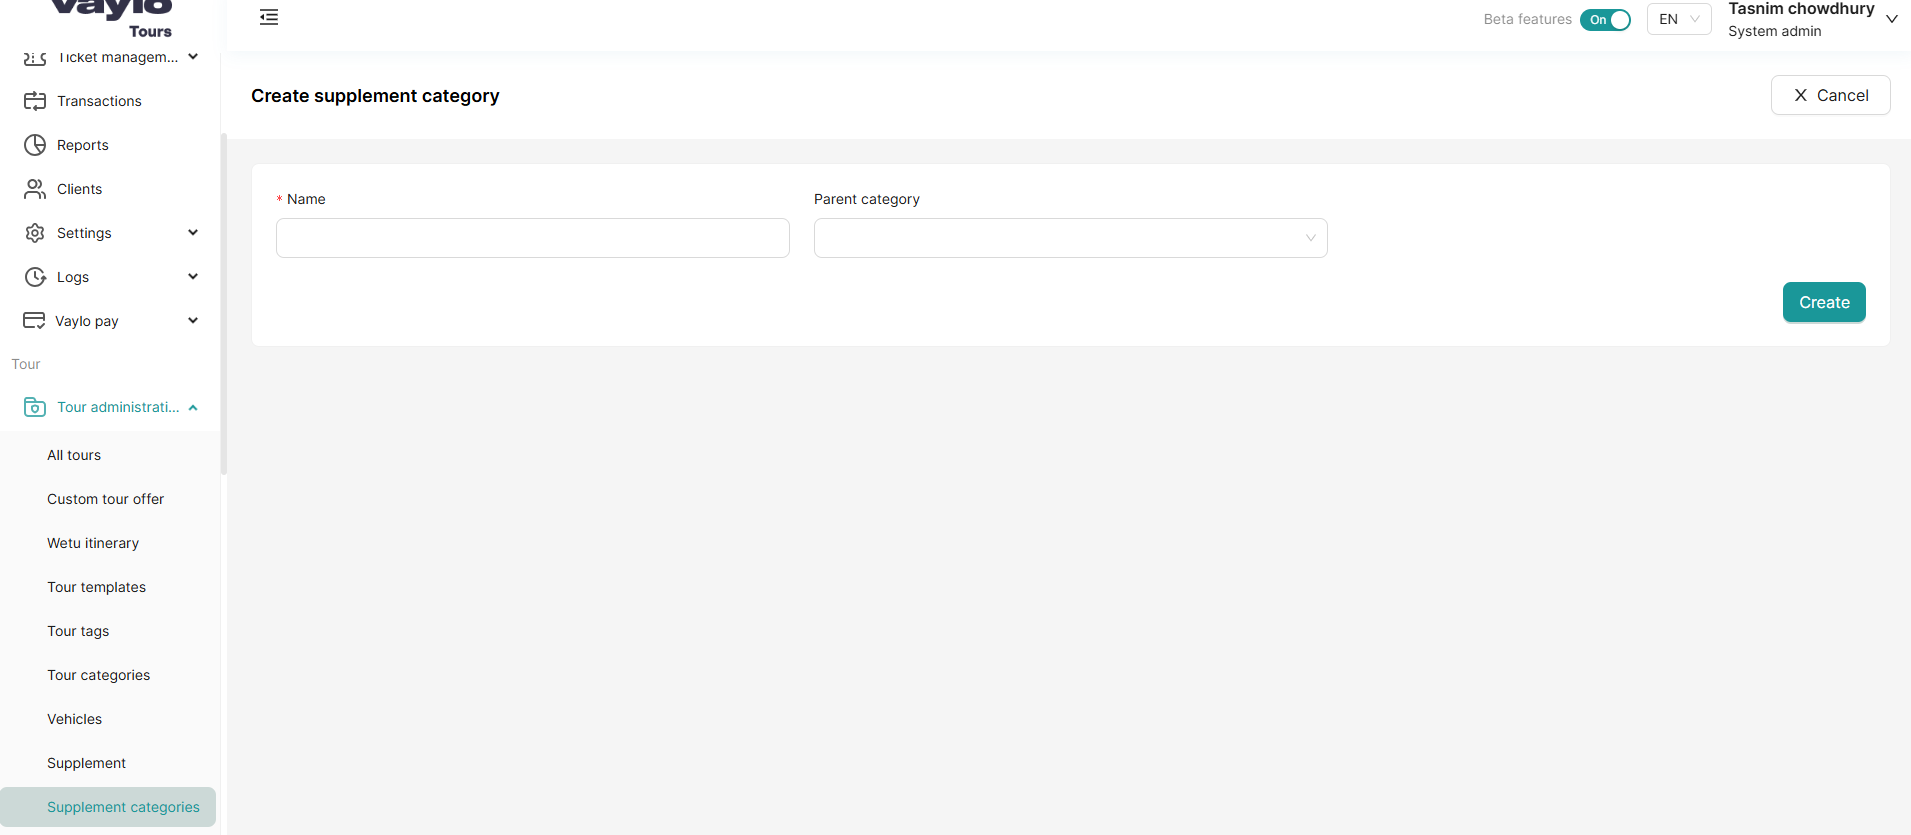
Step 1.4 — Add Supplement Categories
Go to Tour Administration → Supplement categories
Before adding supplements, you must create the categories they belong to (e.g., Meals, Activities, Transfers).
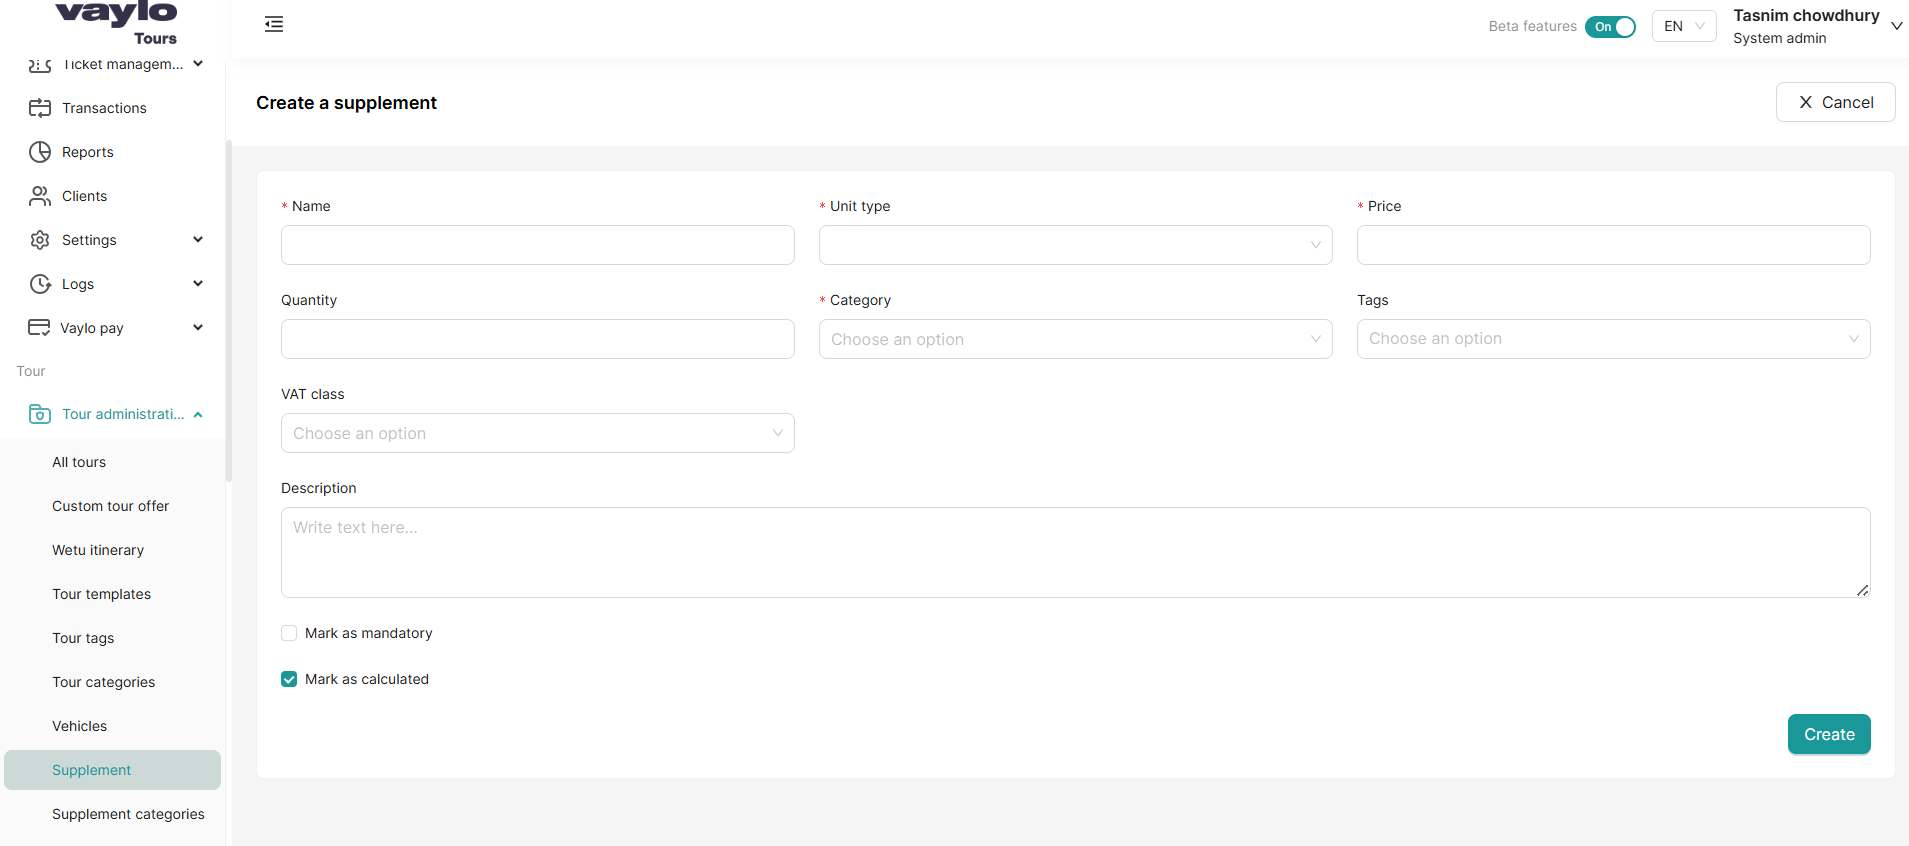
Step 1.5 — Add Supplements
Go to Tour Administration → Supplement
Supplements are the optional extras passengers can select when booking (e.g., Airport Transfer, Guided City Walk, Travel Insurance). Each supplement must be linked to a category.
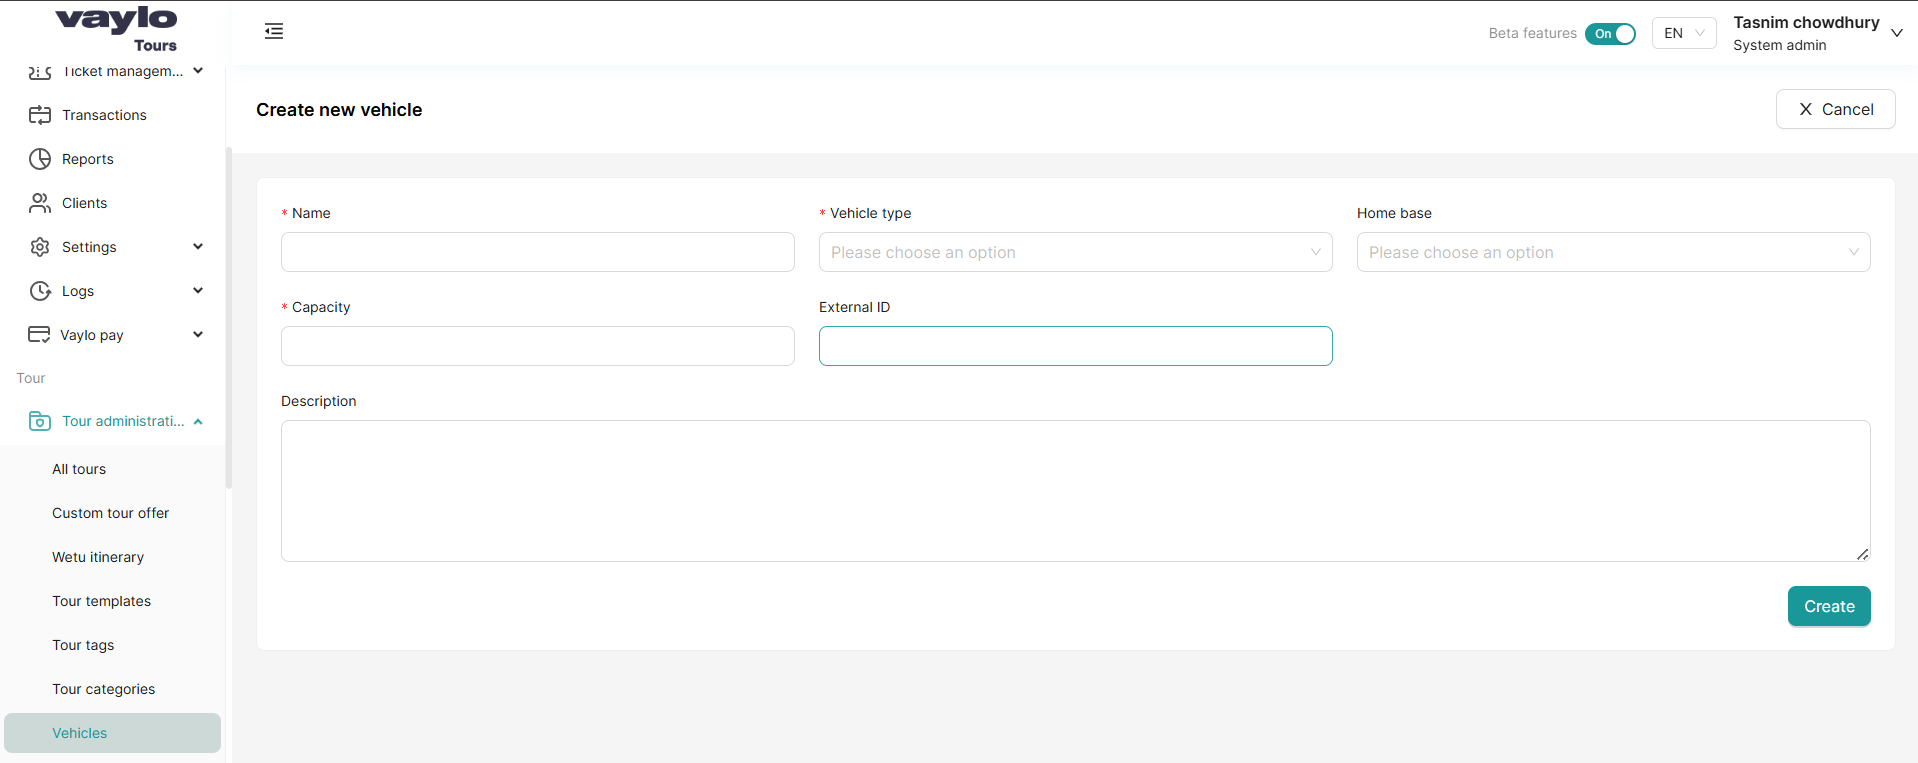
Step 1.6 — Add Vehicles
Go to Tour Administration → Vehicles
Add the vehicles used on your tours (e.g., coach, minibus, boat). These will be selectable when creating a tour.
Skip this step if your tours do not use dedicated transport.
Step 1.7 — Add Hotels & Amenities
Go to Hotel Administration → Add hotel then Add amenities
Add the accommodation options available on your tours. For each hotel, add room types and amenities (e.g., Pool, Breakfast included).
Skip this step if your tours do not include accommodation.

Stage 2: Create Your Tour
Now that all content is ready, build the tour itself.
Step 2.1 — (Optional) Create a Tour Template
If you plan to run multiple similar tours, create a reusable template first. This pre-fills the tour creation form and saves significant time.
👉 See full Tour Template guide
Step 2.2 — Create the Tour
Go to Tour Administration → All Tours → Create a tour
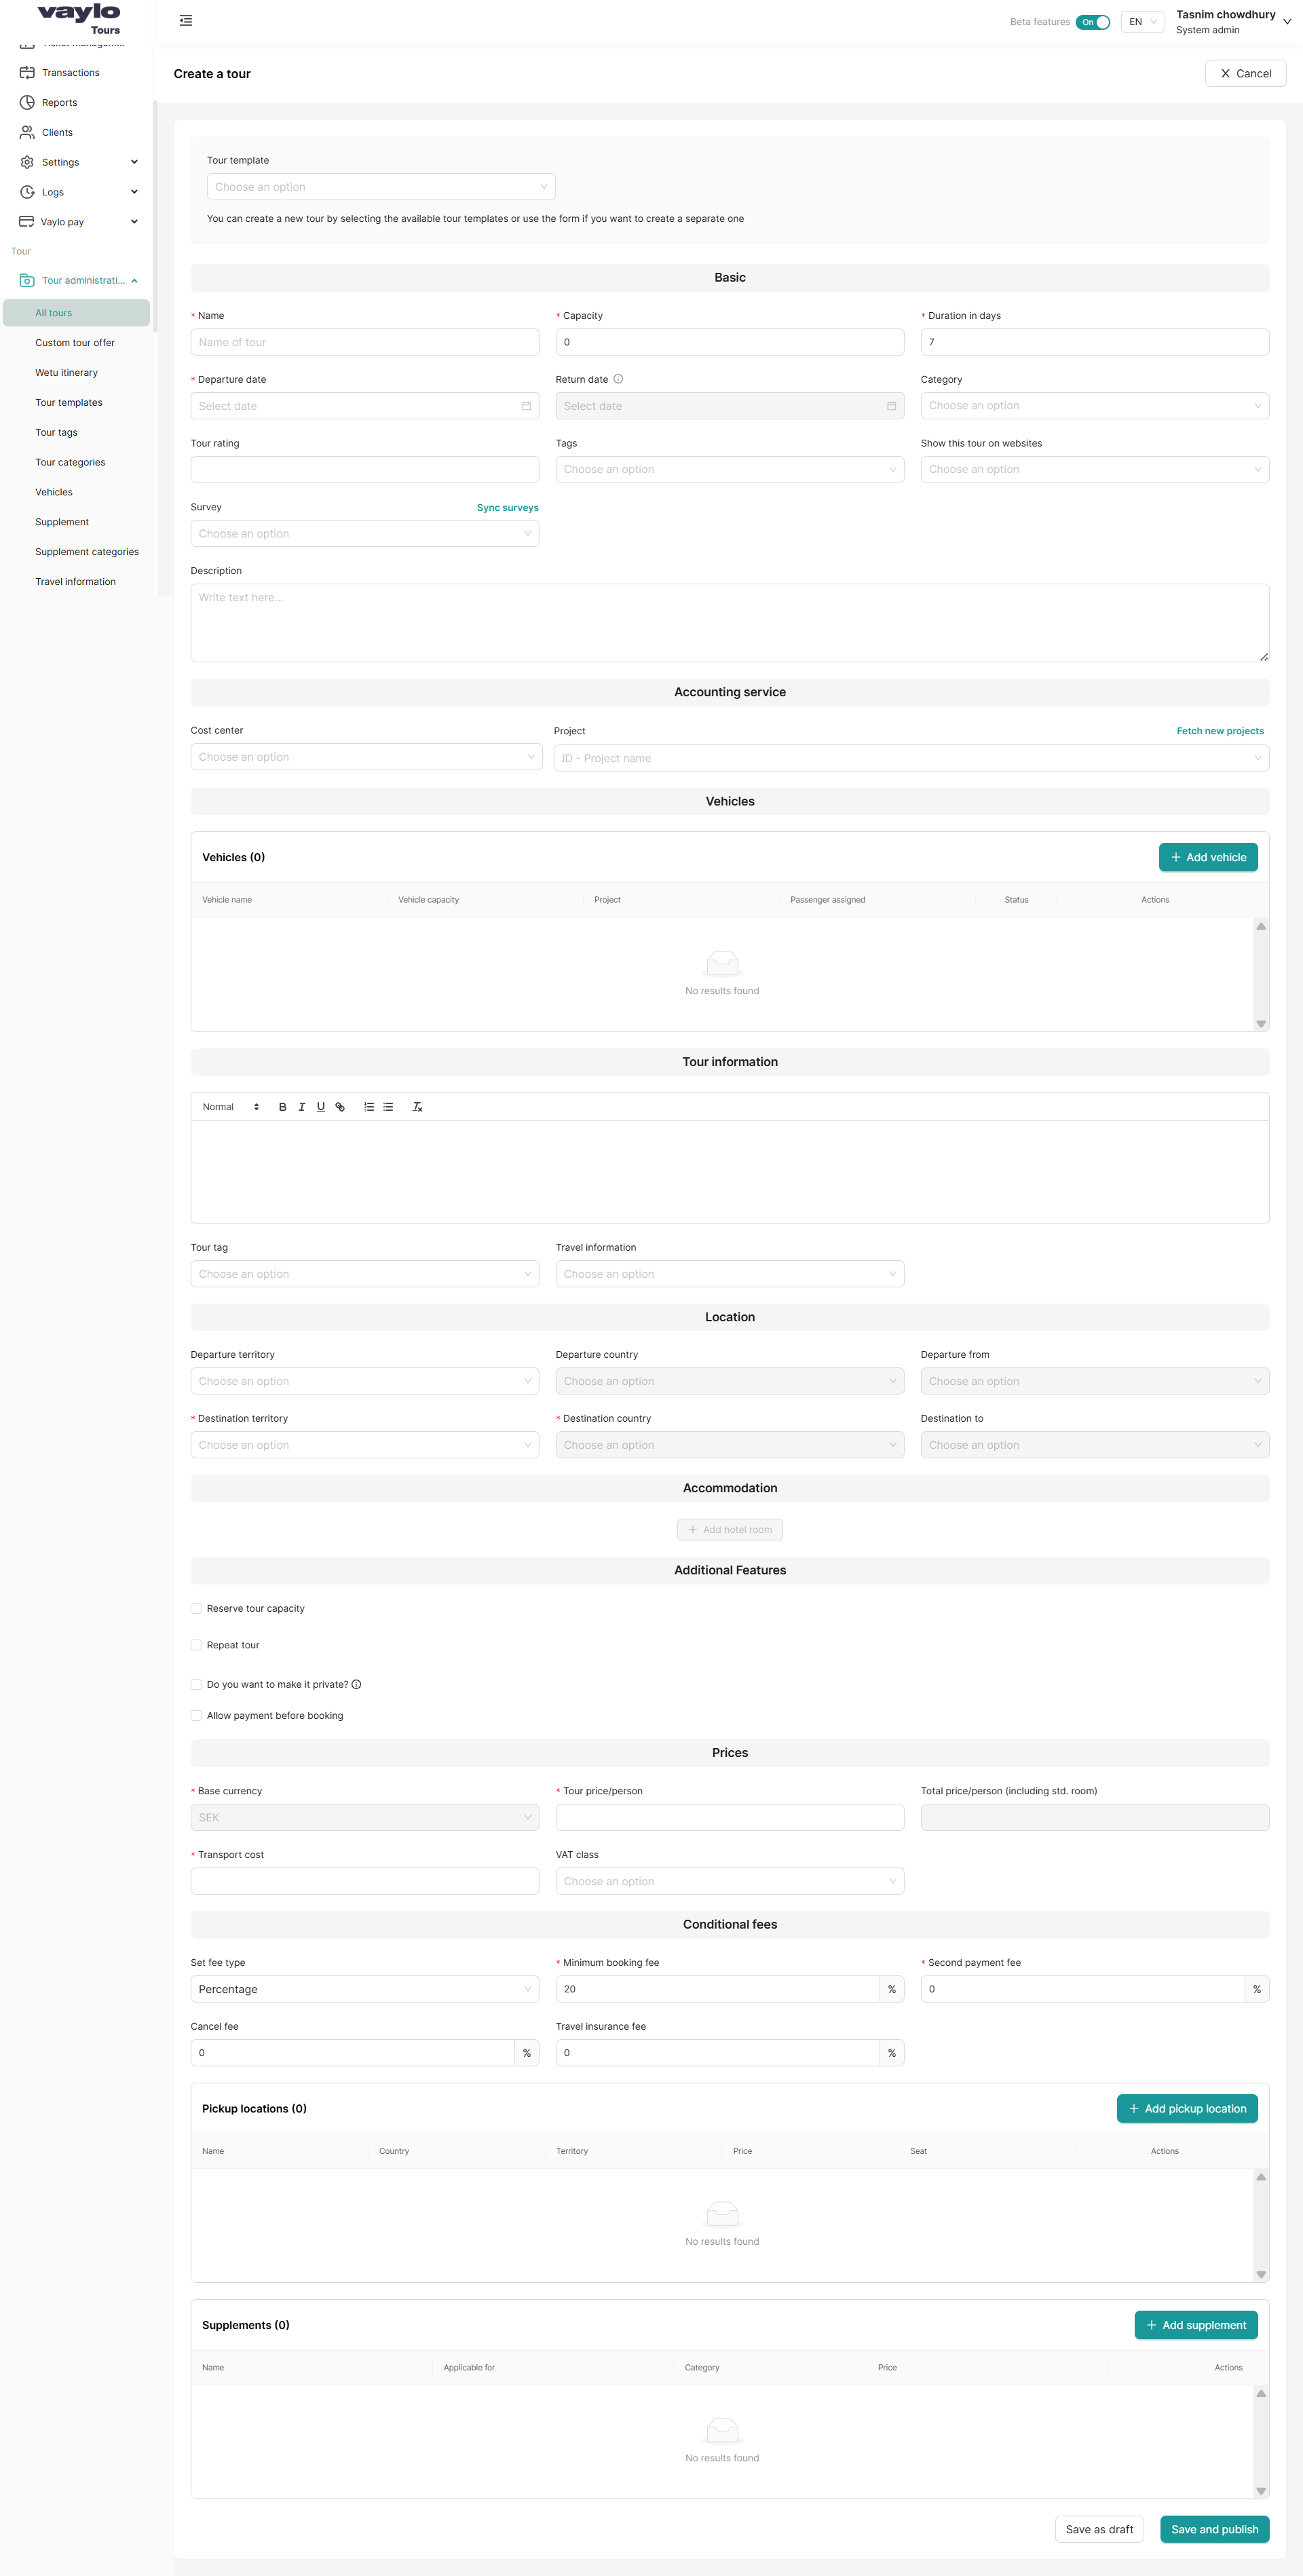
Fill in each section:
🔹 Basic Information
| Field | What to fill in |
|---|---|
| Tour template | Select a template to pre-fill, or leave blank |
| Name (required) | Tour name visible to customers |
| Capacity (required) | Maximum number of passengers |
| Duration in days (required) | How many days the tour runs |
| Departure date (required) | Date the tour departs |
| Return date | Date the tour returns |
| Category | Select the tour category you created in Step 1.2 |
| Tags | Add the tags you created in Step 1.3 |
| Show this tour on websites | Choose which website channels display this tour |
| Description | Write the tour description customers will read |
🔹 Accounting Service
| Field | What to fill in |
|---|---|
| Cost center | Select the cost center for this tour |
| Project | Enter project name/ID, or click Fetch new projects |
🔹 Vehicles
Click + Add vehicle to attach the vehicles you added in Step 1.6.
🔹 Tour Information
Use the rich text editor to write the detailed programme and itinerary notes. Add Travel information (e.g., visa requirements, what to pack) from the dropdown.
🔹 Location
| Field | What to fill in |
|---|---|
| Departure territory | Region the tour departs from |
| Departure country | Country of departure |
| Departure from | Specific city or point |
| Destination territory (required) | Region of the destination |
| Destination country (required) | Country of destination |
| Destination to | Specific destination point |
🔹 Accommodation
Click + Add room to attach the hotels you added in Step 1.7. After setting allotment, always click Refresh.
🔹 Additional Features
| Option | Description |
|---|---|
| Reserve tour capacity | Hold capacity separately for this tour |
| Repeat tour | Enable for recurring tours |
| Make it private? | Hides the tour from the public booking widget |
| Allow payment before booking | Customers can pay before full confirmation |
🔹 Prices
| Field | What to fill in |
|---|---|
| Base currency (required) | e.g., SEK |
| Tour price/person (required) | Base price per passenger |
| Transport cost (required) | Transport cost included in the tour |
| VAT class | Select applicable VAT |
🔹 Conditional Fees
| Field | Default | Description |
|---|---|---|
| Set fee type | Percentage | How fees are calculated |
| Minimum booking fee | 20% | Deposit to confirm booking |
| Second payment fee | 0% | Second payment if applicable |
| Cancel fee | 0% | Cancellation charge |
| Travel insurance fee | 0% | Optional insurance fee |
🔹 Pickup Locations
Click + Add pickup location to add the pickup points you created under Settings → Locations.
🔹 Supplements
Click + Add supplement to add the optional extras you created in Step 1.5.
Step 2.3 — Save and Publish
| Button | What it does |
|---|---|
| Save as draft | Saves tour without publishing. Continue editing later |
| Save and publish | Makes the tour live on your booking widget immediately |
Stage 3: Take Your First Booking
Bookings can come in two ways:
- Customer self-service — through the booking widget on your website
- Manual booking — created by you directly in the admin panel
Step 4.1 — Create a Manual Booking
Go to Tour Administration → Bookings → Create booking
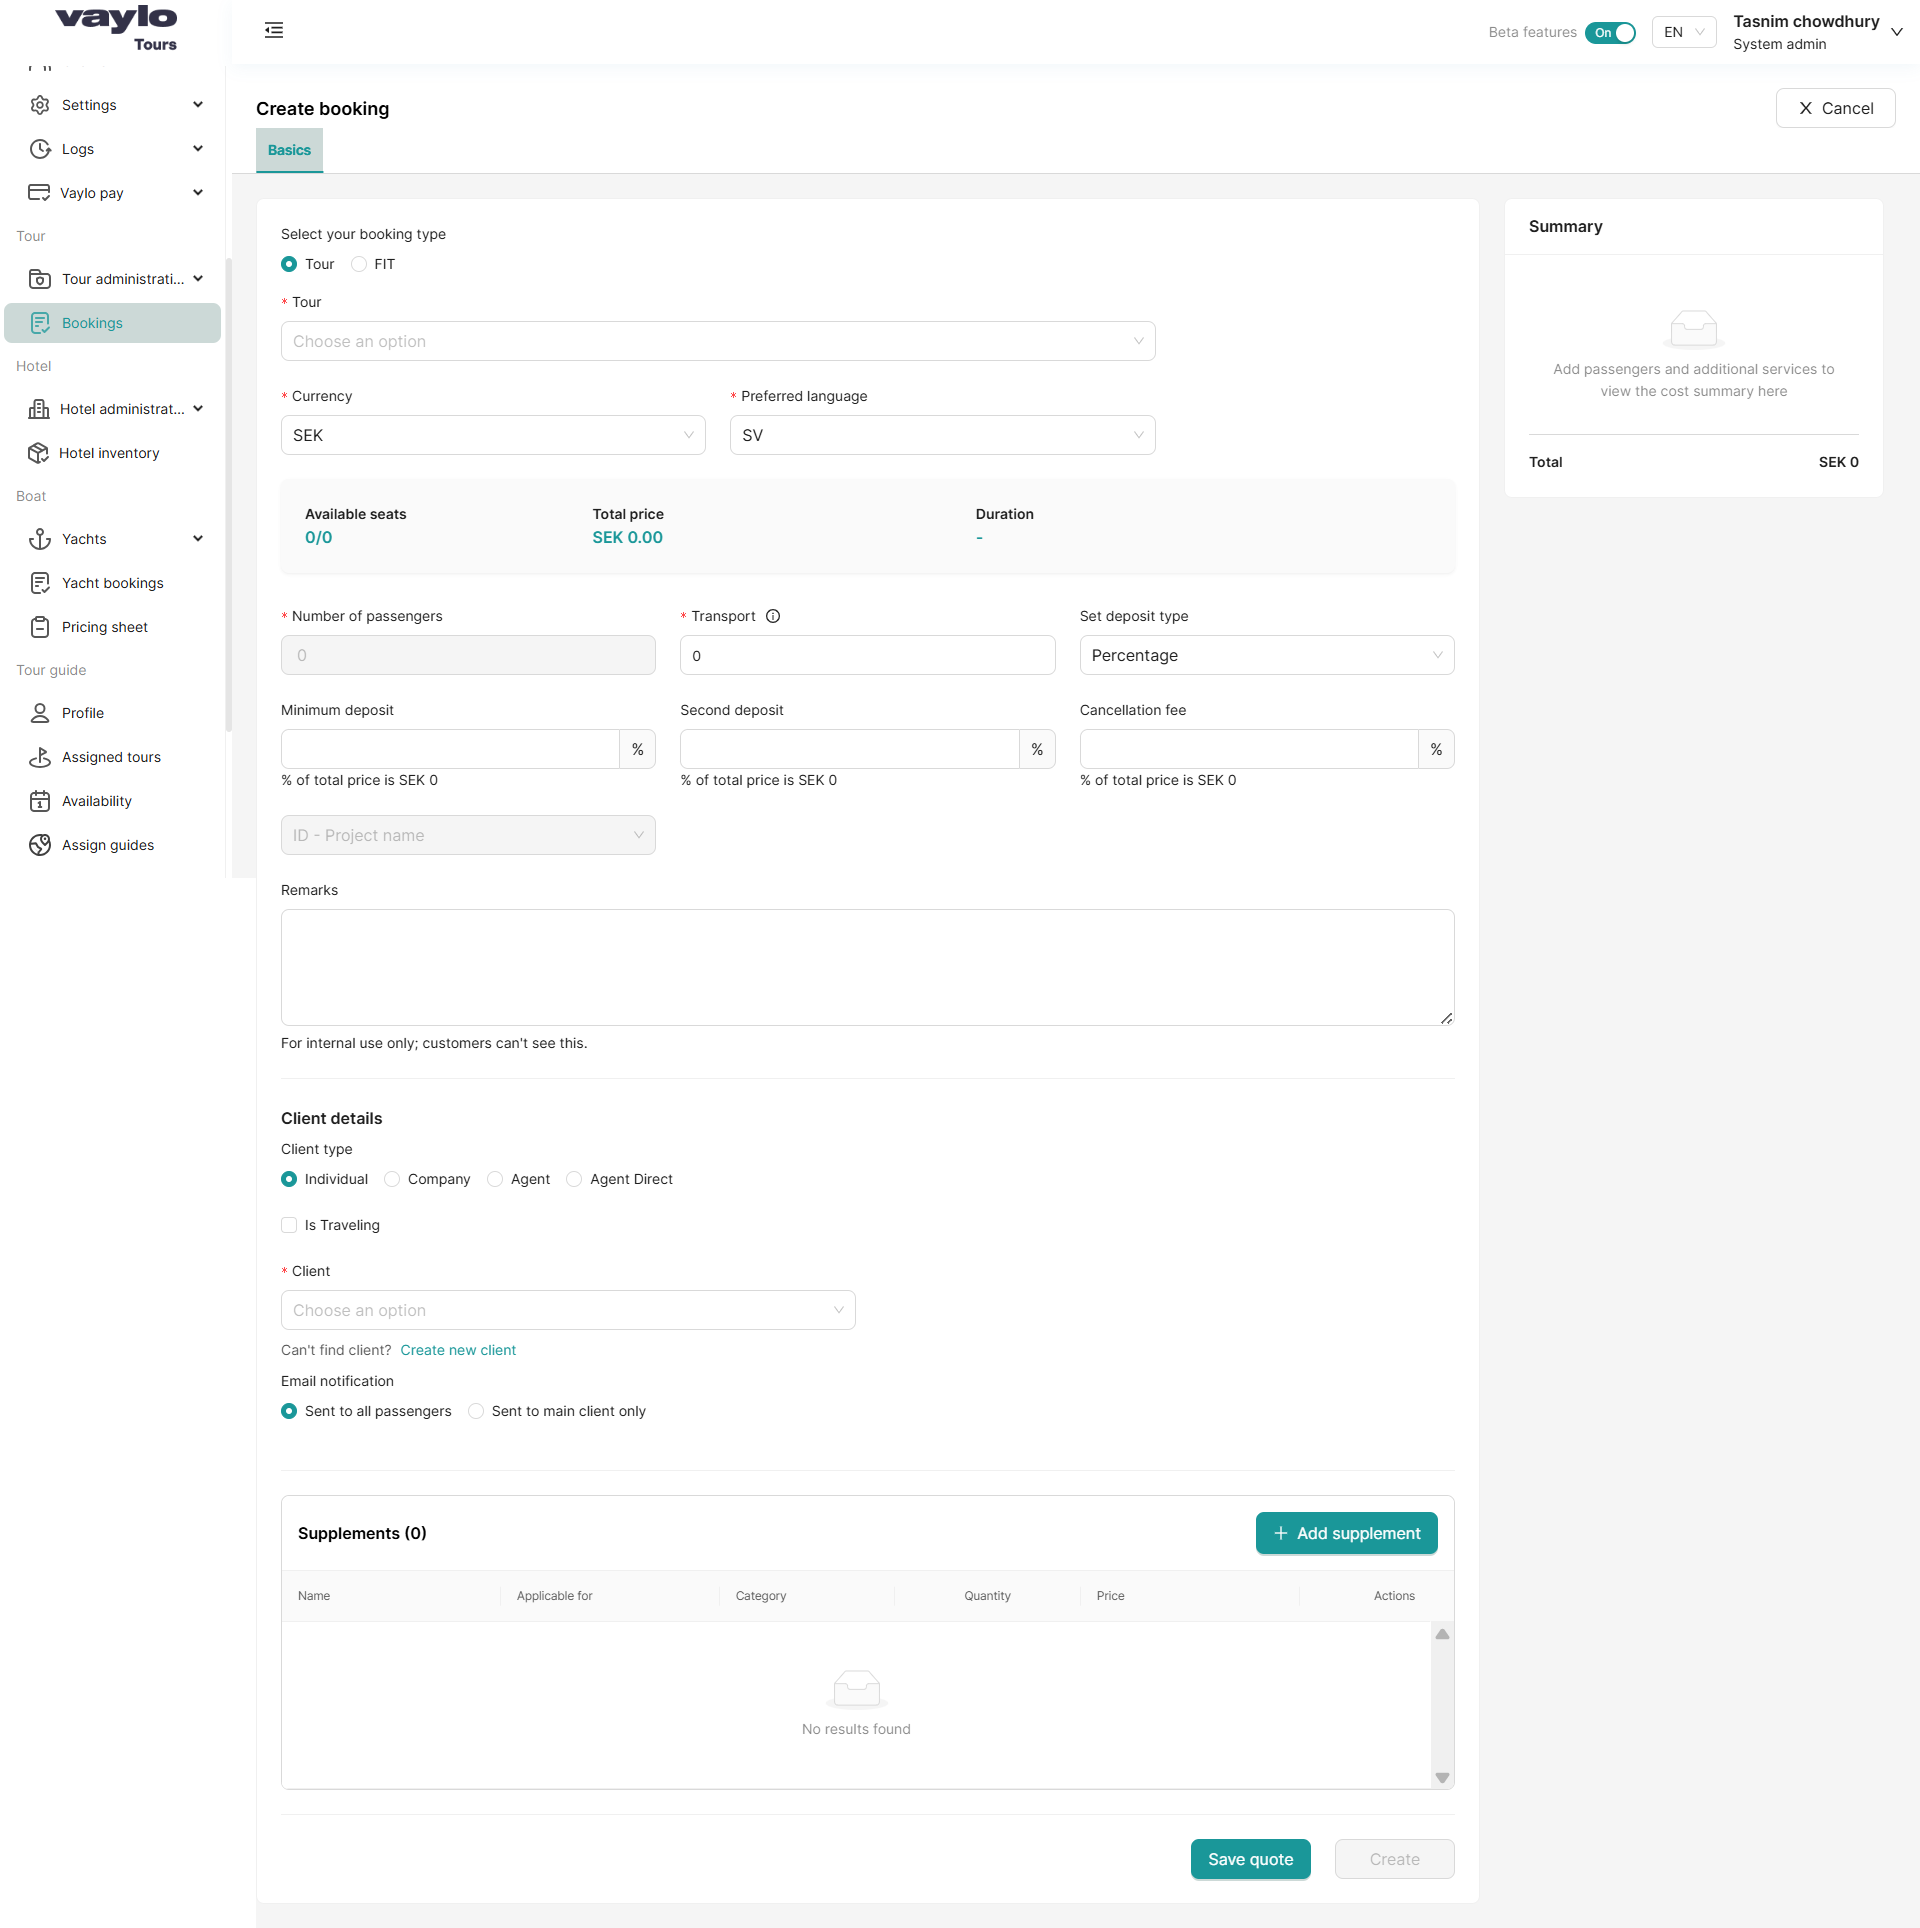
Select Booking Type
| Option | When to use |
|---|---|
| Tour | Booking for a pre-created published tour |
| FIT | Custom flexible itinerary for a specific customer |
Basics Tab
| Field | What to fill in |
|---|---|
| Tour (required) | Select the tour from the dropdown |
| Currency (required) | Confirm the booking currency |
| Preferred language (required) | Customer's language for all communications |
| Number of passengers (required) | Total number of passengers |
| Transport (required) | Transport cost for this booking |
| Set deposit type | Percentage or fixed amount |
| Minimum deposit | Deposit required — auto-filled from tour settings |
| Second deposit | Second payment amount if applicable |
| Cancellation fee | Fee if the booking is cancelled |
| Remarks | Internal notes — customers cannot see this field |
Client Details
| Field | What to fill in |
|---|---|
| Client type | Individual, Company, Agent, or Agent Direct |
| Is Traveling | Check if the client is also travelling on the tour |
| Client (required) | Search and select an existing client, or click Create new client |
| Email notification | Sent to all passengers or Sent to main client only |
Supplements
Click + Add supplement to include optional extras for this specific booking.
| Column | Description |
|---|---|
| Name | The supplement name |
| Applicable for | Which passengers it applies to |
| Category | Supplement category |
| Quantity | Number of units |
| Price | Cost per unit |
Save Options
| Button | What it does |
|---|---|
| Save quote | Saves as a quote — not yet confirmed |
| Create | Confirms the booking and generates a booking reference |
Step 4.2 — The Confirmed Booking
Once created, the booking gets a unique reference number (e.g., VAY-26-0251) and a Booked status.

Booking Tabs
| Tab | What it contains |
|---|---|
| Basics | Core booking details, client info, supplements, and cost summary |
| Itinerary | Day-by-day tour itinerary for this booking |
| Billing | Invoice and billing information |
| Passenger details | All passenger profiles and information |
| Payments | Payment history, deadlines, and outstanding balance |
| Notes | Internal notes and communication log |
| Tasks | Assigned tasks and reminders |
| Full email communication history for this booking |
Payment Status Panel (right side)
| Field | Description |
|---|---|
| Billing total | Total amount due for this booking |
| Paid | Amount already received |
| Due | Outstanding balance |
| Invoiced | Amount invoiced so far |
| Balance | Current account balance |
| First payment deadline | Date the deposit must be paid by |
| Residue payment deadline | Date the remaining balance must be paid by |
Actions Panel (right side)
| Action | What it does |
|---|---|
| Add payment | Record a payment received from the customer |
| Attachments | Upload documents to the booking (e.g., visa copies, flight tickets) |
| Print booking info | Generate a printable booking summary |
| Email booking info | Send the booking information email to the passenger |
| Transfer Booking | Transfer this booking to another tour or date |
| Tickets | Upload or manage flight/event tickets for this booking |
✅ You Are Live!
Your tour is published and your first booking is in. Here is what to explore next:
| Next Step | Guide |
|---|---|
| Manage passengers, flights, and hotels per booking | Itinerary Management |
| See what customers experience after booking | Customer Portal |
| Set up travel agents to book on your behalf | Agent Feature |
| Fine-tune system settings and configurations | System Administration |
Contact the Vaylo support team at any point during your setup. We are here to make your onboarding smooth and successful.